
|
IFD540 GPS/COM - My Pirep |
Post Reply 
|
| Author | |
oskrypuch 
Senior Member 
Joined: 09 Nov 2012 Location: CYFD Status: Offline Points: 3058 |
 Post Options Post Options
") Thanks(0) Thanks(0)
 Quote Reply Quote Reply
 Topic: IFD540 GPS/COM - My Pirep Topic: IFD540 GPS/COM - My PirepPosted: 14 Dec 2014 at 12:45am |
|
I have posted the below on a few forums. We are more or less the converted here, but a new person on the forums may find this of interest.
~~~~~~~~~~~~~~~~~~~~~~~~~~~~~~~~~~~~~~~~~~~~~~~~~~~~~~~~~~~~~ In a word, it is WONDERFUL. Maybe having waited as long as I have, has sweetened it more, but you don't have to wait for it now, it is one week shipping. Hard to know where to start to try to describe it all. First out with the old (430W & GTX330):  Then IN with the new, The Avidyne IFD540 GPS/COM and APX340 ADS-B transponder, here is the whole center stack: 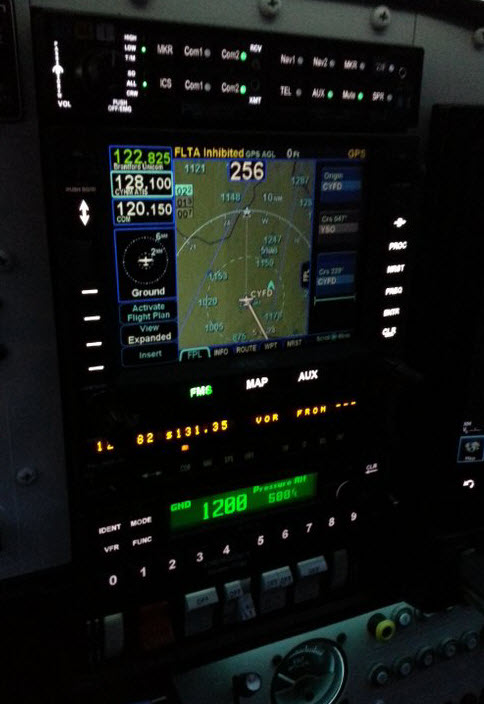 This is a screen capture from the simulator, for a crisp view of the main screen. 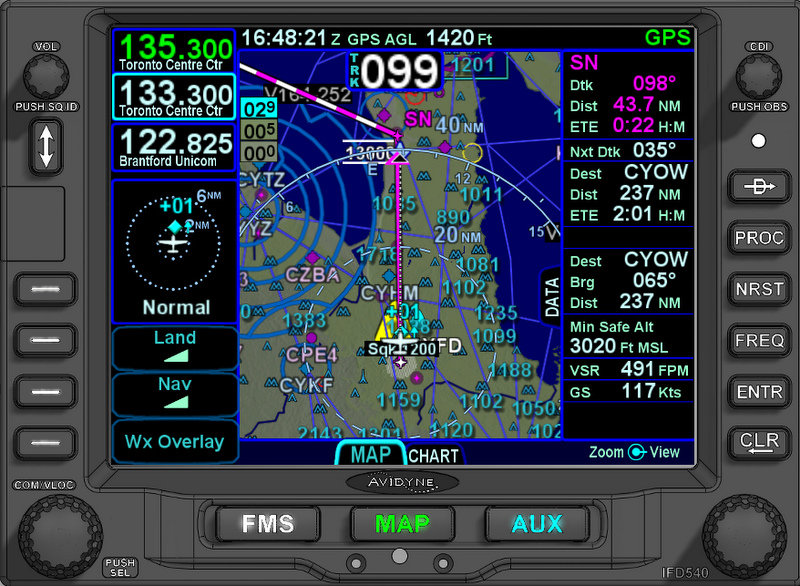 The screen is a page and tab, plus side tab construct. The bottom buttons are rockers, you can move through tabs, or you can direct touch tabs on the screen. The side tabs can be slid out, or in, and some will pull out across the screen to fill it. (eg. Flight Plan tab) Either the bezel buttons, or the touchscreen can be used to access the button pushes. (eg. Wx Overlay) With the Hybrid Touch interface, you can do most anything with either bezel controls or the touch interface. I kind of like holding onto the knobs and turning, but some functions the touchscreen makes more sense. Nice to be able to use both, everyone will have their preference. You can have up to four preselect frequencies, here I've configured for three. In this config you toggle between COM & NAV frequencies with the bottom left knob. All frequencies, including active and the presets for both COM & NAV are auto-id. On the above screen configuration there is a traffic thumbnail, and the separate land and nav feature declutter buttons. The 540 will also declutter on the basis of altitude. All of this is user configurable. Both the right and left datablock areas you can populate with data fields as you like. In the 10.1 release the entire datablock area on the right will scroll up & down, letting you define and view a relatively unlimited number of fields. That is a key feature to help the smaller screened 440. There is a terrain/obstacle height key in the top left of the map. This shows three values, the lowest terrain in the displayed map (within the outer range ring), the highest, and if higher, the highest obstacle height. The Min Safe Alt is different, it is the conventional grid square value, doesn't key to the range of the map. The GPS AGL at the top, is a poor man's radar altimeter, gives the GPS height above the terrain database elevation for your current point. You can select a North up, track up or heading up view, and there is also a 240 degree (partial arc) track up and heading up view. If you have a track up setting, then your own ship will cant as according to the winds, to show your crab angle. The next active leg is shown as a barber pole. 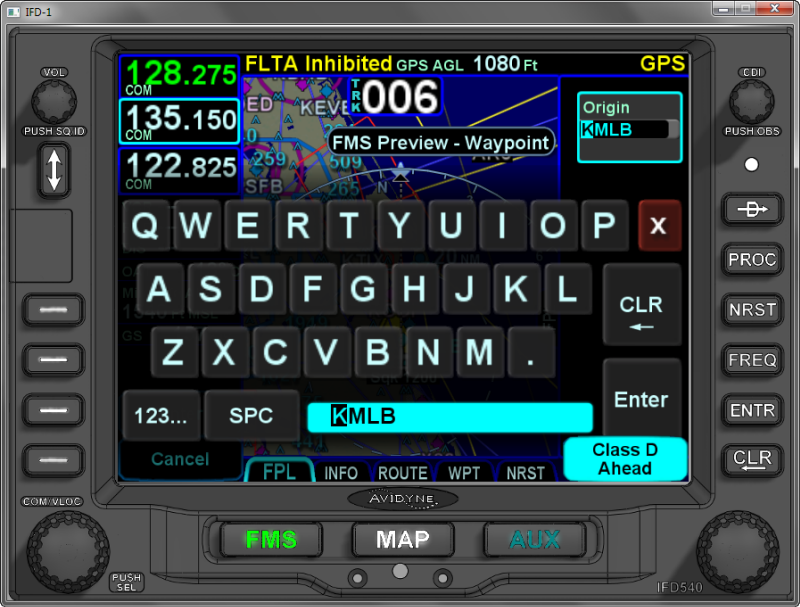 QWERTY, together with "geo-fill" auto filling of text fields, lets you zip through selections. Geo-fill will fill the rest of text entry fields with a logical entry, saving you keystrokes. Entering COM frequencies you can use 197 for 119.70, or for VORs you can use the VOR ID, for example YQO for 114.2. Incidentally, the IFD440 due out this Spring, the IFD540's smaller cousin (430 size) will also have a full QWERTY screen, and the same quick entry methods. In fact it will have everything the 540 has, feature-wise, except those things specific to a larger screen. Building a route. 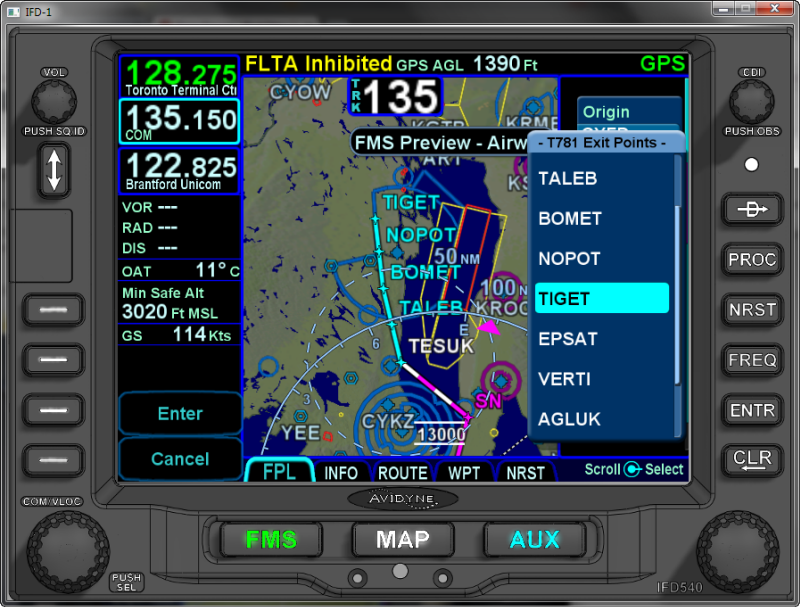 Of course you have full airway support, but with a really cool twist. As you build your route, you get a full dynamic display of the proposed route (auto-zoomed for you), with all the waypoints listed geographically, right on your main map page. As you select one of them, the map rezooms, and redraws the proposed route. When happy with the exit point, you select it again and all the waypoints are added. The same method is used for adding a procedure, together with its transition. never need to wonder which transition goes where. You can add any number of airports (duplicating them in a row as well) in your route, and an arrival and or approach for each. It is all reflected in one long flight strip. Handy when doing IFR practice approaches. OK, back to the "real" in cockpit pics. There is a bewildering number of data fields that you can add.  There are three custom configurations now, you can populate as you like. There will five more for the 10.1 release. In the following release, you will be able to set various screen configurations to auto-transition, depending on the phase of flight!! That is actually one of the suggestions I made to development team. The openness of Avidyne to customer interaction is remarkable, and it will result in a stronger product. They have public forums at http://forums.avidyne.com 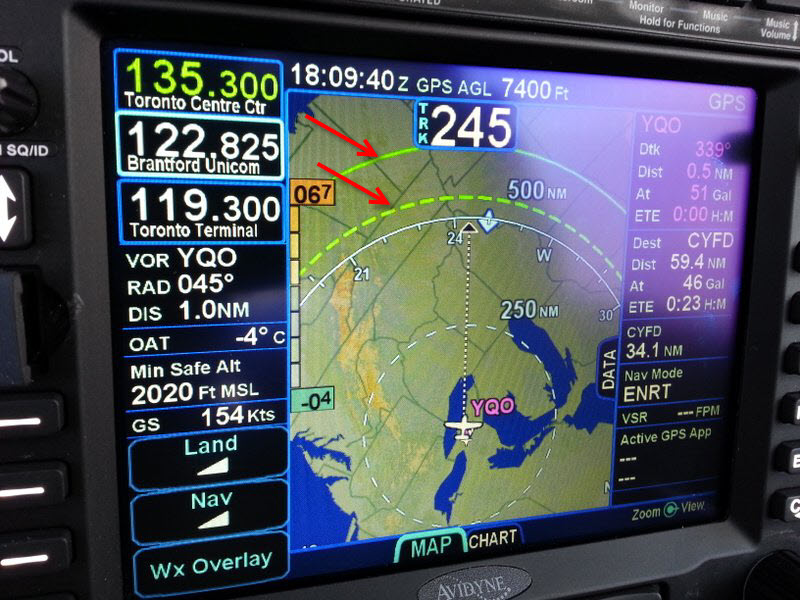 I've pulled the scale way back here to show a very cool feature. The IFD gets airdata from the ASPEN, and fuel data from the EDM830. Here, based on current GS, fuel burn and capacity available it shows two range rings (red arrows), the dashed is distance to 45 min reserve, the solid is the distance to "empty". The flight plan track is not really visible in this pic, because it is so short at this scale, it was just a local flight. But, YQO (Aylmer VOR) is the next waypoint. it auto-loads as the active frequency when its leg becomes active, and I've placed the VOR/LOC info datafield just below the freq. That gives your current bearing and distance, like having DME back. I added waypoint datafields on the right, and you can see the expected fuel remaining at the next & final waypoints is also included here. I've also chosen to have the direct to destination distance (as the crow flies) shown. Next is the Nav Mode, and below that an extremely powerful field, the VSR, the vertical speed required. What makes this so powerful is that you can define an altitude constraint relative to every waypoint in the flight plan. You might be wondering what those altitude constraints look like, well here are two examples, once entered they show in plain text. Here I have slid out the FPL tab (on the FMS page), so you can see it better: 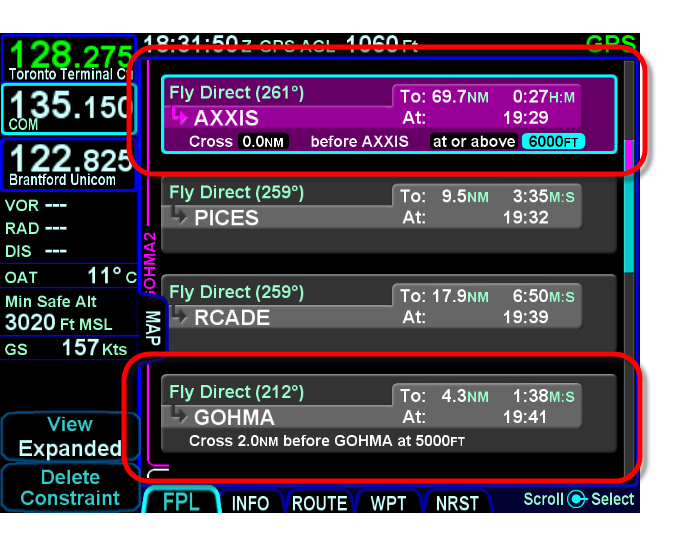 Even cooler, the IFD will populate the minimum altitudes for a approach automatically, showing this on the flight plan and on the screen, and the VSR field will reflect these. More in the pics below. I also have our Jepp plate subscription installed, so you can toggle to the plates. These are geo-referenced, and the rectangles draw on the main map screen. They are a little small, but the pinch to zoom and flick interface lets you use them effectively. They also have a quick header, plan and minimums view selection. OK, on the approach into my home airport, RNav 05. 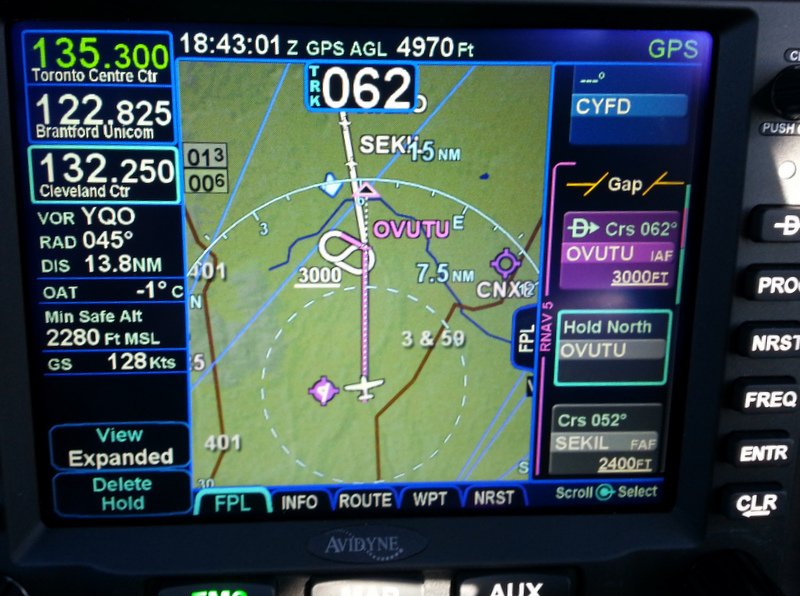 You can see on the scrunched flight plan strip on the right I'm heading for OVUTU (IF/IAF), and there is a listed minimum altitude of 3000ft. That is also depicted on the map. There is no hold on this approach, I have added a custom hold at OVUTU, holding north. The IFD auto configures the entry with the least amount of turn, here you can see the parallel leg as a barber pole. I can delete this hold, or change it (leg length or time, and inbound course) by clicking on the descriptor in the flight plan strip. Bottom left is a DELETE HOLD button. Once you are in the hold, it changes to EXIT HOLD. Holds are done, just like the big boy's FMS. You can also see the SEKIL waypoint, the FAF, with the FAF minimum right on the strip. When it become the active leg, the minimum is drawn on the map. The IFD has another very cool safety feature. With an approach active, if you go below the FAF minimum, before reaching the FAF, it will show you a CAS (crew alerting system) caution notice - "check altitude, too low". Hope i never commit that, but if I did ... OK, past the FAF, inbound. 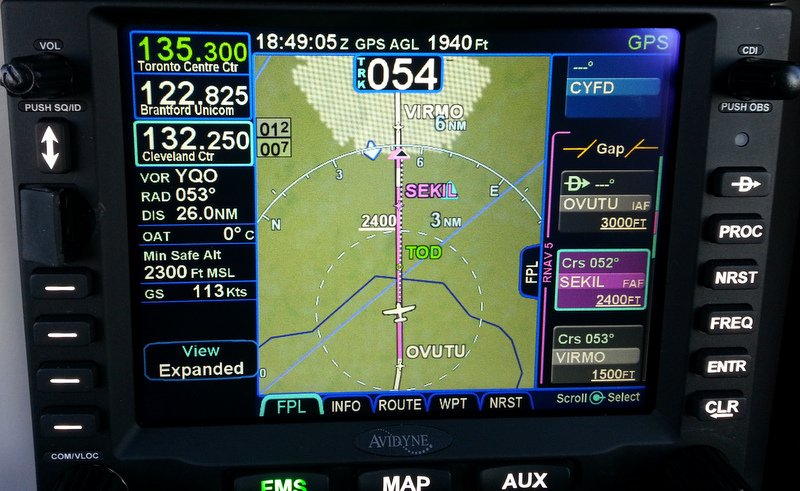 I'm in track UP, 240* view. Note that the own ship image is canted to the left to represent my crabbing due to the crosswind. Also Note the cyan TOD marking, that is where you should start down. You get a nice Ding-Dong tone to remind you 10 secs before. The TOD is calculated for any segment (ascent, cruise or approach) where you have an altitude restriction ahead, and you reach your target required vertical ascent/descent rate. The default is 500 fpm, you can set it to whatever you like. OK, approach into CYHM, a neighboring controlled airport, here on the LOC30 approach. 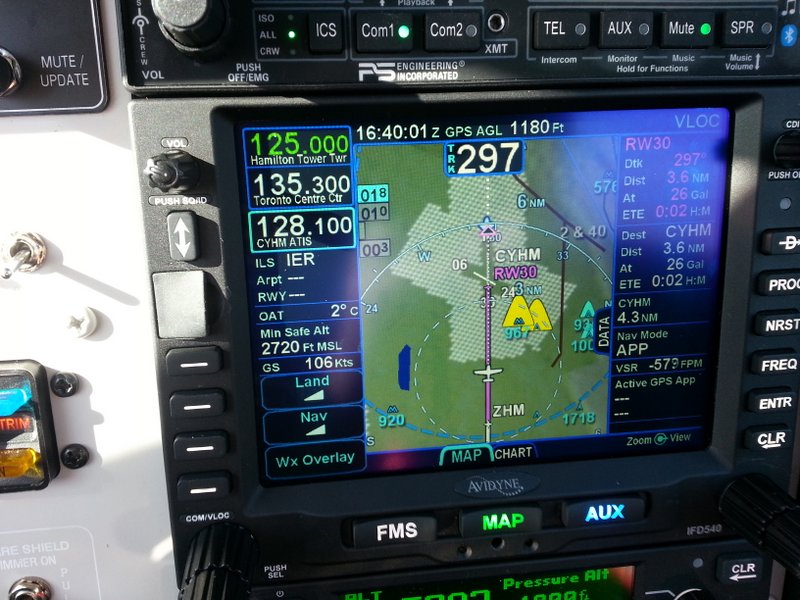 There is no vertical guidance on the LOC of course, but no worries, the VSR field shows you the current required VS to make the minimums at the MAP, making a constant descent approach real easy. You can dive and drive if you wish, but even then you can use that to ensure you are too late in your descent. To set that up all I had to do was - nothing. The numbers populate when you select the approach, you just fly it. Note the oversized yellow obstacle indication. That is part of the Forward Looking Terrain Avoidance (FLTA) available in the base configuration of the IFD, normally you have to get full TAWS to see that, the IFDs include it in the base units. The FLTA (Forward Looking Terrain Avoidance) feature is amazing stuff. Normally that is only available with a full TAWS-B option (a pricey GPS/COM option), but the IFD540 includes it even without TAWS.  Here, I've purposely stayed too low in the simulator, ignoring
the TERRAIN, PULL UP aurals. Note the cross-hatched
red/yellow markings covering half of the map, these show a
conventional terrain warning, and highlight the areas within
100ft and 1000ft of current altitude. But, also note the much smaller, brighter red and yellow just ahead (and behind) the current aircraft position. This is computed FLTA, and shows where you will collide (red) with terrain based on your current altitude, speed and VS. It is only the FLTA that generates the terrain aurals, so if you hear it, watch out, it is for real. Note at the top the computed GPS AGL of minus 560ft. Much as the map shows, I've tunneled into the Appalachians here.  Yup, the IFD540 has it! Nothing else to buy or add. A software update will liven it up. The possibilities are tantalizing, from ADS-B and GPS data out, to things like keyboard support! There are some short youtube videos here, showing common tasks: Avidyne's main site is just the obvious www.avidyne.com OK, that's enough for now, BACK TO FLYING. Any questions, just shoot. * Orest Edited by oskrypuch - 15 Dec 2014 at 10:06pm |
|
 |
|
|
Gring
Senior Member
Joined: 30 Dec 2011 Location: Kingston, NY Status: Offline Points: 720 |
Post Options
Thanks(0)
Quote Reply
Posted: 14 Dec 2014 at 9:03am |
|
Orest,
Great write up. I wrote an article that was published in the American Bonanza Society magazine which was basically a compilation and summary of what I wrote in the "My Avidyne Stack" thread on BeechTalk. You may look into submitting what you wrote above to the Piper's owner magazine.
|
|
|
|
|
ddgates
Senior Member

Joined: 12 Aug 2011 Location: Deer Valley Status: Offline Points: 1100 |
Post Options
Thanks(0)
Quote Reply
Posted: 14 Dec 2014 at 9:07am |
|
Bravo, thanks for your posting.
Your posting references three modifiable configurations - how is this done? thanks. Edited by ddgates - 14 Dec 2014 at 9:34am |
|
|
David Gates
|
|
|
|
|
roy32jm
Newbie 
Joined: 06 Nov 2014 Status: Offline Points: 18 |
Post Options
Thanks(0)
Quote Reply
Posted: 14 Dec 2014 at 11:13am |
|
Quick overview. My install consists of G500, dual 540, KFC200, and 340. I am learning about the functionality of the 540 and 500 simultaneously.
When entering a hold I ran into some issues. I was approaching the IAF at an angle that required a teardrop entry. The 540 recognized this and the next step indicated was a course reversal. The 540 map depicted a magenta teardrop. The G500 indicated both the teardrop and the racetrack as being active and the CDI changed to the in bound course. As I crossed the IAF the AP wanted to turn directly to the inbound course (the opposite direction) as opposed to tracking the teardrop course reversal. To fly this I switched to heading mode, and for a time hand flew. The problem with doing this of course is that during one of the most critical and disorienting phases of flight you are winging it not even following command bars. What is the proper procedure? Why the difference between active routes on the 500 and 540? After crossing the IAF inbound the rest of the approach behaved as expected. |
|
|
be on time, do what you say, finish what you start, say please and thank you
|
|
|
|
|
oskrypuch
Senior Member
Joined: 09 Nov 2012 Location: CYFD Status: Offline Points: 3058 |
Post Options
Thanks(0)
Quote Reply
Posted: 14 Dec 2014 at 12:01pm |
Great idea. I'd be really unhappy if I didn't know about a better avionics alternative, and ended up installing something that was not as capable. We need to get the word out. I've already converted a number of folks with my post, who were planning on getting *armin stuff. * Orest Edited by oskrypuch - 14 Dec 2014 at 12:05pm |
|
|
|
|
oskrypuch
Senior Member
Joined: 09 Nov 2012 Location: CYFD Status: Offline Points: 3058 |
Post Options
Thanks(0)
Quote Reply
Posted: 14 Dec 2014 at 12:03pm |
Well, only the factory default set is fixed. Although it is only the Custom setting that is nearly fully modifiable, the other two are modifiable to some extent. * Orest |
|
|
|
|
ddgates
Senior Member
Joined: 12 Aug 2011 Location: Deer Valley Status: Offline Points: 1100 |
Post Options
Thanks(0)
Quote Reply
Posted: 14 Dec 2014 at 12:06pm |
|
Thanks.
|
|
|
David Gates
|
|
|
|
|
AviJake
Admin Group 
Joined: 26 Mar 2009 Location: Lincoln MA Status: Offline Points: 2815 |
Post Options
Thanks(0)
Quote Reply
Posted: 14 Dec 2014 at 12:29pm |
|
Roy, what approach was that? Our lab as has a G500 and dual 540s (but no KFC200 right now). We'll "fly" that approach on Monday and send some feedback.
|
|
|
Steve Jacobson
sjacobson@avidyne.com |
|
|
|
|
roy32jm
Newbie
Joined: 06 Nov 2014 Status: Offline Points: 18 |
Post Options
Thanks(0)
Quote Reply
Posted: 14 Dec 2014 at 10:29pm |
|
Steve,
It was the RNAV 13 at KMBY. I approached DRADE at a heading of about 300. Thanks, I greatly appreciate the help! |
|
|
be on time, do what you say, finish what you start, say please and thank you
|
|
|
|
|
chflyer
Senior Member

Joined: 24 Jan 2013 Location: LSZK Status: Offline Points: 1022 |
Post Options
Thanks(0)
Quote Reply
Posted: 15 Dec 2014 at 1:34pm |
|
Many thanks for posting this Orest. Lot's of tidbits of info and ideas for my own setup once installed. A real service to the rest of us.
One question that comes up is related to the LOC30 screenshot. I notice that the VLOC info box below the frequencies just shows the LOC ident. The airport and rwy fields are dashed out. Did it stay that way throughout? Not really important since the airport and RW30 as next wpt are on the map. Just wondering.
|
|
|
Vince
|
|
|
|
|
oskrypuch
Senior Member
Joined: 09 Nov 2012 Location: CYFD Status: Offline Points: 3058 |
Post Options
Thanks(0)
Quote Reply
Posted: 15 Dec 2014 at 10:01pm |
Well, you're welcome. Was just planning a short note, then the afternoon disappeared!
As to the empty fields, I was wondering the same thing, but have not got around to posting about it. It may be a Cdn airport data issue. Just posted a question about this. * Orest Edited by oskrypuch - 15 Dec 2014 at 10:14pm |
|
|
|
|
AviJake
Admin Group
Joined: 26 Mar 2009 Location: Lincoln MA Status: Offline Points: 2815 |
Post Options
Thanks(0)
Quote Reply
Posted: 18 Dec 2014 at 8:41am |
|
As Orest notes, he created a new thread for the empty field issue. But in summary, it's a bug and it will be fixed in Rel 10.1 due out in the spring.
|
|
|
Steve Jacobson
sjacobson@avidyne.com |
|
|
|
|
chflyer
Senior Member
Joined: 24 Jan 2013 Location: LSZK Status: Offline Points: 1022 |
Post Options
Thanks(0)
Quote Reply
Posted: 25 Dec 2014 at 8:14am |
|
Another question, Orest. Just after one of the photo shots above you indicate that you are in track UP, 240* view. How do you select the 240* view? Track up is clear (aux/setup/user options LSK/map orientation). I can't find any reference to this in the manual nor can I find it on the sim.
Edited by chflyer - 25 Dec 2014 at 8:16am |
|
|
Vince
|
|
|
|
|
Gring
Senior Member
Joined: 30 Dec 2011 Location: Kingston, NY Status: Offline Points: 720 |
Post Options
Thanks(0)
Quote Reply
Posted: 25 Dec 2014 at 8:54am |
|
Merry Christmas. To select the different MAP views, you press the Right knob and it will cycle between North Up, Track UP, Track UP 240 arc view. See page 3-2 of the user's guide.
Also note, if you have panned the screen using a touch swipe, you can return to the centered view by push and holding the knob.
|
|
|
|
|
oskrypuch
Senior Member
Joined: 09 Nov 2012 Location: CYFD Status: Offline Points: 3058 |
Post Options
Thanks(0)
Quote Reply
Posted: 25 Dec 2014 at 10:57am |
Geoffrey already got you. Only to add, the setting you note in the User Setup actually selects between two groups of views: 1) Track UP, Track up 240*, North UP and 2) Heading UP, Heading UP 240*, North UP * Orest Edited by oskrypuch - 25 Dec 2014 at 11:01am |
|
|
|
|
oskrypuch
Senior Member
Joined: 09 Nov 2012 Location: CYFD Status: Offline Points: 3058 |
Post Options
Thanks(0)
Quote Reply
Posted: 25 Dec 2014 at 10:58am |
Oh, I was looking for that one, but it only works on the MAP page, on the FMS view it seems to just trigger a cursor. * Orest Edited by oskrypuch - 25 Dec 2014 at 11:02am |
|
|
|
|
Post Reply
|
|
 Tweet
Tweet
|
| Forum Jump | Forum Permissions You cannot post new topics in this forum You cannot reply to topics in this forum You cannot delete your posts in this forum You cannot edit your posts in this forum You cannot create polls in this forum You cannot vote in polls in this forum |


 Topic Options
 Gring wrote: